Laravel5系 + MySQLの環境構築・連携方法

こんにちはYsです。Webエンジニアとして働いています。
先日、CentOS7 + Vagrant + Laravelで環境構築を行う記事を書きました。
前回記事≫ Vagrant + CentOS7 + Laravel5系のインストール方法
上記の記事ではMySQLないしは、SQLiteなど入れていないのでマイグレーション関係が動きません。
なのでこの記事では、実際にマイグレーションファイルを動かすためにMySQLをインストールしつつ、設定ファイルを編集して、Laravel側からMySQLを触れるようにしたいと思います。
目次
- MySQLのインストール
- CentOS7側の設定変更
- MySQLでDB作成
- Laravel側の設定変更
- Laravel側からマイグレーションファイルの実行・接続確認
スポンサードサーチ
CentOS7にMySQLのインストール
インストールの前に不要な物を削除したいと思います。CentOS7ではMariaDBと言われるものがデフォルトで入っているのでこれをまずは削除します。(システム側がMySQLと混同しても嫌なので)
※別段、不具合ない場合は消さなくても大丈夫です。
# Maria系のものが入っているのか確認(無いのであれば読み呼ばして大丈夫です。)
[vagrant@localhost ~]$ rpm -qa | grep -i "mariadb"
mariadb-libs-5.5.44-1.el7_1.x86_64
mariadb-5.5.44-1.el7_1.x86_64

# 不要なのでMaria系を削除する
[vagrant@localhost ~]$ sudo yum remove -y mariadb mariadb-libs
MySQLのインストール
CentOS7にMySQLをインストールしていきます。
# MySQL用のリポジトリをインストール
[vagrant@localhost ~]$ sudo yum -y install http://dev.mysql.com/get/mysql-community-release-el7-5.noarch.rpm

# MySQLとその他パッケージをインストール
[vagrant@localhost ~]$ sudo yum -y install mysql mysql-devel mysql-server mysql-utilities
mysql --versionで無事にインストールされたのかを確認します。以下のように出力されていればOK
[vagrant@localhost ~]$ mysql --version
mysql Ver 14.14 Distrib 5.6.44, for Linux (x86_64) using EditLine wrapperバージョンだけではなく、より詳細に知りたいという方はmysqladmin versionを試してみてください。
[vagrant@localhost ~]$ mysqladmin version
mysqladmin  Ver 8.42 Distrib 5.6.44, for Linux on x86_64
Copyright (c) 2000, 2019, Oracle and/or its affiliates. All rights reserved.

Oracle is a registered trademark of Oracle Corporation and/or its
affiliates. Other names may be trademarks of their respective
owners.

Server version          5.6.44
Protocol version        10
Connection              Localhost via UNIX socket
UNIX socket             /var/lib/mysql/mysql.sock
Uptime:                 4 hours 30 min 22 sec

Threads: 1  Questions: 112  Slow queries: 0  Opens: 71  Flush tables: 1  Open tables: 62  Queries per second avg: 0.006
CentOS7側の設定変更(MySQLサーバー起動)
上記でMySQLをインストールしたのはいいですが、デフォルトだとMySQLは動きません。(何せ何も起動していないので)
なので、CentOS側の設定を修正して起動時にMySQLの起動も同時に行うように設定を行います。
✅1番上のものを今回は設定します ・MySQLサーバー自動起動ONsystemctl enable mysqld.service・MySQLサーバー自動起動OFFsystemctl disable mysqld.service・MySQLサーバー起動systemctl start mysqld.service・MySQLサーバー停止systemctl stop mysqld.service
自動起動をONにしようとすると色々聞かれますが、2.vagrantを選択し、password:vagrantと記入します。
※passwordの部分は入力しても何も表示されません。
[vagrant@localhost ~]$ systemctl enable mysqld.service
==== AUTHENTICATING FOR org.freedesktop.systemd1.manage-unit-files ===
Authentication is required to manage system service or unit files.
Multiple identities can be used for authentication:
 1.  veewee
 2.  vagrant
Choose identity to authenticate as (1-2): 2 # 2を選択します
Password: # vagrantと入力します(※ここに入力しても何も表示されません)
==== AUTHENTICATION COMPLETE ===
==== AUTHENTICATING FOR org.freedesktop.systemd1.reload-daemon ===
Authentication is required to reload the systemd state.
Multiple identities can be used for authentication:
 1.  veewee
 2.  vagrant
Choose identity to authenticate as (1-2): 2 # 2を選択します
Password: # vagrantと入力します(※ここに入力しても何も表示されません)
==== AUTHENTICATION COMPLETE ===上記のように1番下にAUTHENTICATION COMPLETEと出力されていればOKです。失敗しているとAUTHENTICATION FAILEDと出力されます。
無事に起動しているか見てみましょう。Active: active (running)になっていれば無事に起動がされています。
[vagrant@localhost ~]$ systemctl status mysqld.service
● mysqld.service - MySQL Community Server
   Loaded: loaded (/usr/lib/systemd/system/mysqld.service; enabled; vendor preset: disabled)
   Active: active (running) since 金 2019-05-24 06:41:55 UTC; 4s ago
  Process: 19219 ExecStartPost=/usr/bin/mysql-systemd-start post (code=exited, status=0/SUCCESS)
  Process: 19159 ExecStartPre=/usr/bin/mysql-systemd-start pre (code=exited, status=0/SUCCESS)
 Main PID: 19218 (mysqld_safe)
   CGroup: /system.slice/mysqld.service
MySQLでDBを作成
Laravel側で使用するために、Laravelで使用するプロジェクト用にDBを作成します。初回作成なのでrootで入りつつ、Laravel側で使用するDBとユーザーを作成します。
MySQL rootユーザーログイン
# rootユーザーでログイン
[vagrant@localhost web_samp]$ mysql -u root -p
Enter password: #Enterキーを押すだけでOK
Welcome to the MySQL monitor.  Commands end with ; or \g.
Your MySQL connection id is 4
Server version: 5.6.44 MySQL Community Server (GPL)

Copyright (c) 2000, 2019, Oracle and/or its affiliates. All rights reserved.

Oracle is a registered trademark of Oracle Corporation and/or its
affiliates. Other names may be trademarks of their respective
owners.

Type 'help;' or '\h' for help. Type '\c' to clear the current input statement.

mysql>
データベースの作成
今回は、laravelappというデータベースを用意します。以下のように、Query OKと出力されていればOKです。
mysql> create database laravelapp;
Query OK, 1 row affected (0.00 sec)
データベースが作成されたのか以下のコマンドで確認をします。
mysql> show databases;
+--------------------+
| Database           |
+--------------------+
| information_schema |
| laravelapp         | # laravelappが作成されていればOK
| mysql              |
| performance_schema |
+--------------------+
4 rows in set (0.00 sec)
ユーザーの作成
Laravelのプロジェクト側で使用する専用のユーザーを作成します。ユーザー名はlaraveluserとしておきます。パスワードは任意で構いません。{database_name}は先ほど作成したDB名を使用します。
grant all on {database_name}.* to {database_user}@localhost identified by {password};
mysql> grant all on laravelapp.* to laraveluser@localhost identified by 'larvel23x5';作成したユーザーでMySQLにログイン
現状、rootユーザーでログインをしているので一度、exitでmysqlを出て、再度作成したユーザー{laraveluser}でログインをして動作確認を行います。
# rootユーザーからログアウト
mysql> exit
Bye

# 作成したユーザーでMySQLにログイン
[vagrant@localhost ~]$ mysql -u laraveluser  -p
Enter password: # 先ほど設定したパスワードでログインをします。
Welcome to the MySQL monitor.  Commands end with ; or \g.
Your MySQL connection id is 19
Server version: 5.6.44 MySQL Community Server (GPL)

Copyright (c) 2000, 2019, Oracle and/or its affiliates. All rights reserved.

Oracle is a registered trademark of Oracle Corporation and/or its
affiliates. Other names may be trademarks of their respective
owners.

Type 'help;' or '\h' for help. Type '\c' to clear the current input statement.
上記のようにログインできていればMySQL側の動作確認はOKです。
Laravel側の設定変更
Laravel側のプロジェクトを開き、.envファイルというものがあるのでそれを開きます。
[vagrant@localhost web_sample]$ ls -la
total 440
drwxr-xr-x 27 vagrant staff 864 5 19 20:52 .
drwxr-xr-x 4 vagrant staff 128 5 19 19:50 ..
-rw-rw-r-- 1 vagrant staff 213 5 14 22:28 .editorconfig
-rw-r--r-- 1 vagrant staff 790 5 19 17:54 .env # ←このファイルを開きます。
-rw-rw-r-- 1 vagrant staff 739 5 14 22:28 .env.example
-rw-rw-r-- 1 vagrant staff 111 5 14 22:28 .gitattributes
-rw-rw-r-- 1 vagrant staff 151 5 14 22:28 .gitignore
-rw-rw-r-- 1 vagrant staff 174 5 14 22:28 .styleci.yml
drwxr-xr-x 7 vagrant staff 224 5 14 22:28 app
-rwxr-xr-x 1 vagrant staff 1686 5 14 22:28 artisan
drwxr-xr-x 4 vagrant staff 128 5 14 22:28 bootstrap
-rw-rw-r-- 1 vagrant staff 1550 5 14 22:28 composer.json
-rw-r--r-- 1 vagrant staff 159029 5 19 17:54 composer.lock
drwxr-xr-x 15 vagrant staff 480 5 14 22:28 config
drwxr-xr-x 6 vagrant staff 192 5 14 22:28 database
-rw-r--r-- 1 vagrant staff 6832 5 19 20:52 npm-debug.log
-rw-rw-r-- 1 vagrant staff 1125 5 14 22:28 package.json
-rw-rw-r-- 1 vagrant staff 1156 5 14 22:28 phpunit.xml
drwxr-xr-x 9 vagrant staff 288 5 14 22:28 public
-rw-rw-r-- 1 vagrant staff 4151 5 14 22:28 readme.md
drwxr-xr-x 6 vagrant staff 192 5 14 22:28 resources
drwxr-xr-x 6 vagrant staff 192 5 14 22:28 routes
-rw-rw-r-- 1 vagrant staff 563 5 14 22:28 server.php
drwxr-xr-x 5 vagrant staff 160 5 14 22:28 storage
drwxr-xr-x 6 vagrant staff 192 5 14 22:28 tests
drwxr-xr-x 41 vagrant staff 1312 5 19 17:54 vendor
-rw-rw-r-- 1 vagrant staff 538 5 14 22:28 webpack.mix.js
.envファイルの中を開くと、DB関連の記述があるのでその部分を修正していきます。以下のように修正してください。
✅具体的には以下の部分を修正します
DB_HOST=127.0.0.1 ≫ DB_HOST=localhost
DB_DATABASE=homestead ≫ DB_DATABASE=laravelapp
DB_USERNAME=homestead ≫ DB_USERNAME=laraveluser
DB_PASSWORD=secret ≫ DB_PASSWORD={上記で設定したpassword}
# デフォルトでは以下のようになっていると思います
DB_CONNECTION=mysql
DB_HOST=127.0.0.1
DB_PORT=3306
DB_DATABASE=homestead
DB_USERNAME=homestead
DB_PASSWORD=secret

# 上記を以下のように修正します
DB_CONNECTION=mysql
DB_HOST=localhost
DB_PORT=3306
DB_DATABASE=laravelapp
DB_USERNAME=laraveluser
DB_PASSWORD=larvel23x5
これでLaravel側の設定が完了です。
Laravel側からマイグレーションファイルの実行・接続確認
実際にマイグレーションファイルを作成して、DBに変更が反映されるか作成します。今回は適当にPostモデルを作成してそれに付随するマイグレーションファイルを一緒に作成します。
マイグレーションファイルの作成
php artisan make:model {model_name} --migrationで作成が可能です。※マイグレーションファイルの作成はLaravelプロジェクト内で行なってください
以下のように、モデルとマイグレーションファイルが作成されていればOKです。
[vagrant@localhost web_sample]$ php artisan make:model Post --migration
Model created successfully.
Created Migration: 2019_05_25_201347_create_posts_table
ちなみに作成されたマイグレーションファイルは以下にあります。
.
├── app
├── artisan
├── bootstrap
├── composer.json
├── composer.lock
├── config
├── database
│   ├── factories
│   ├── migrations ここにマイグレーションファイルがあります
│ └── seeds
マイグレーションファイルの編集
マイグレーションファイルを変更しますが、今回はテストなので細かいもの省略は省きます。title[dataType:string]とlongtext[dataType:text]というカラムを作成する想定でマイグレーションファイルを編集します。
編集するファイルは先ほど作成された2019_05_25_201347_create_posts_tableというファイルを編集します。
編集する部分はup()の中のみ。down()は切り戻す際に使用します。
    /**
     * Run the migrations.
     *
     * @return void
     */
    public function up()
    {
        Schema::create('reviews', function (Blueprint $table) {
            $table->bigIncrements('id');
            $table->string('title');
            $table->text('longtext');
            $table->timestamps();
        });
    }
これで準備が出来たので次に実際に実行していきます。
マイグレーションファイルの実行
マイグレーションの実行の前にデフォルトで入っているマイグレーションファイルがあるのでこれを削除します。
✅以下の上位2つ(2014〜)は不要なので削除
├── migrations
│   ├── 2014_10_12_000000_create_users_table.php
│   ├── 2014_10_12_100000_create_password_resets_table.php
│   └── 2019_03_03_201347_create_posts_table これは自分が作成したファイル
削除したら、マイグレーションを実行します。以下のように出力されていればOK。
[vagrant@localhost web_samp]$ php artisan migrate
Migrating: 2019_03_03_201347_create_posts_table
Migrated:  2019_03_03_201347_create_posts_table
データベースの確認
実際にMySQLにログインして、テーブルとカラムが生成されたのかを確認します。MySQLへのログインは、Laravel用に作成した上記のものを使用します。
# MySQLにログイン
[vagrant@localhost web_samp]$ mysql -u laraveluser -p
Enter password:
Welcome to the MySQL monitor.  Commands end with ; or \g.
Your MySQL connection id is 15
Server version: 5.6.44 MySQL Community Server (GPL)

Copyright (c) 2000, 2019, Oracle and/or its affiliates. All rights reserved.

Oracle is a registered trademark of Oracle Corporation and/or its
affiliates. Other names may be trademarks of their respective
owners.

Type 'help;' or '\h' for help. Type '\c' to clear the current input statement.

# Databaseの確認
mysql> show databases;
+--------------------+
| Database           |
+--------------------+
| information_schema |
| laravelapp         |
+--------------------+
2 rows in set (0.00 sec)

# 使用するDatabaseの指定
mysql> use larabelapp;
Database changed

# テーブルの確認
mysql> show tables;
+----------------------+
| Tables_in_laravelapp |
+----------------------+
| migrations           |
| posts                |
+----------------------+
2 rows in set (0.00 sec)
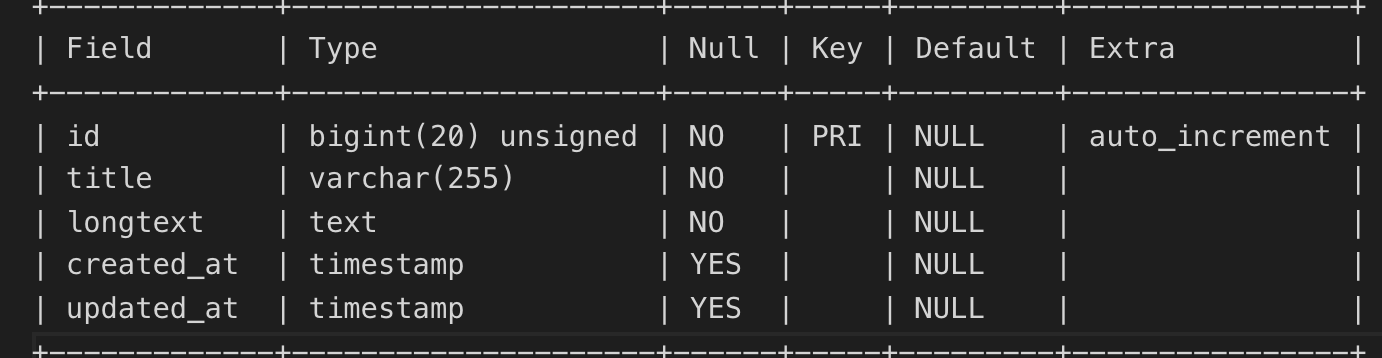
上記全ての確認が終わったら、desc posts;を試します。DB構造が以下のようになっていれば成功です。
まとめ
LaravelでMySQLを使用した一連の流れを解説しました。ぶっちゃけSQLiteの方が設定等は楽なのですが、LAMP環境の開発の方が多い(僕もそうですが)ので、あえてMySQLで設定を行いました。
引き続き、Laravelの勉強を兼ねて当ブログで発信していきます。
人気記事【独学者おすすめ】プログラミング学習動画サービス3選